The Conversations page is your unified inbox. Every SMS, email, WhatsApp message, Facebook message, and Instagram DM lands here in one place. When you click into Conversations from the sidebar, you will see three main columns: the inbox list on the left, the conversation history in the middle, and the contact details panel on the right.
This is the page you should bookmark and keep open throughout the day. It gives you everything you need to manage communication with leads and members without switching between tools.
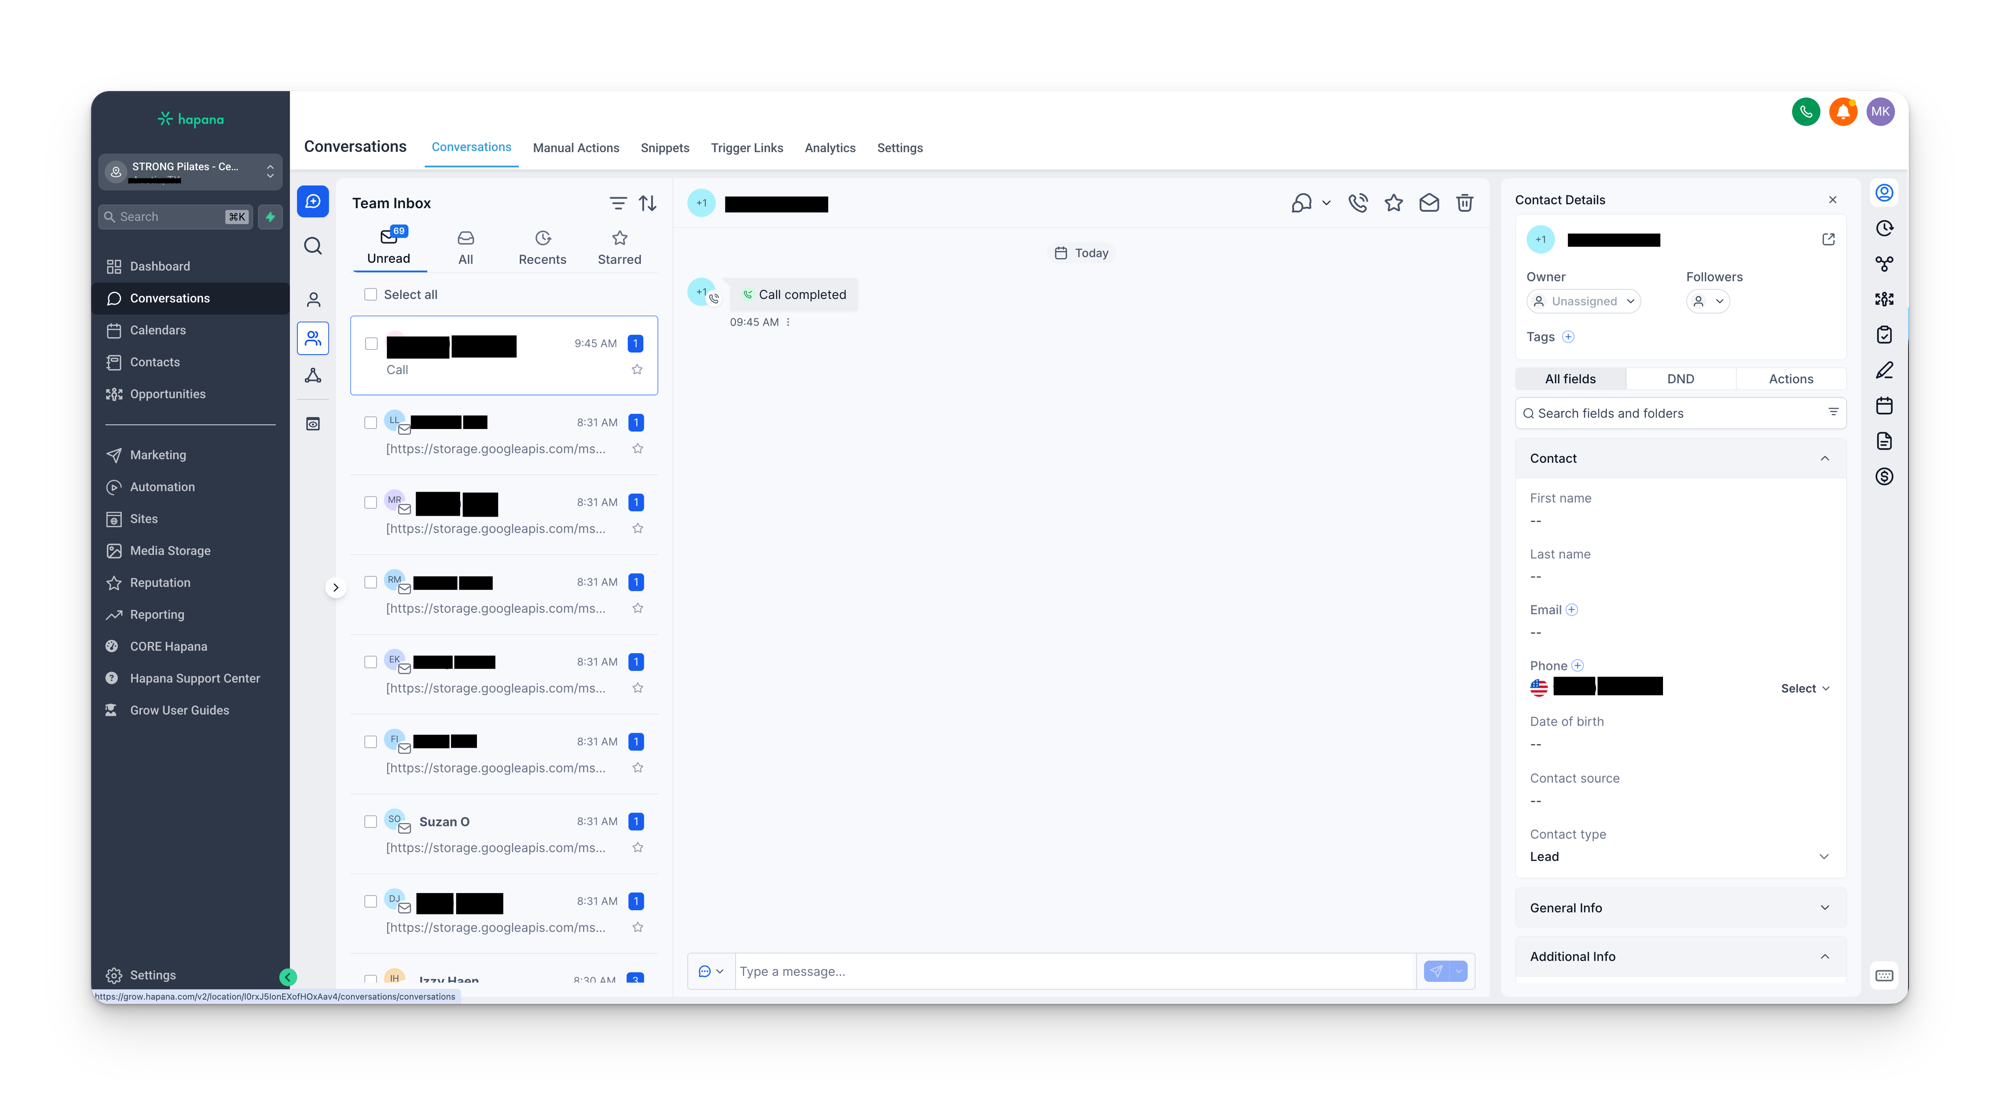
The inbox (left pane)
The left column is your inbox list. It shows contact names with a preview of the most recent message. At the top, you have four sections you can switch between:
- Unread: messages you have not marked as read yet. Clicking on a conversation to read it does not automatically mark it as read. You have to click Mark as Read for it to be removed from this section. This is intentional so you can preview a message without losing track of it.
- Recents: the most recent communications, including outgoing automated messages. You will see a lot of activity here because your workflows are constantly sending emails and SMS in the background. Even if you have not manually sent anything, automated outgoing messages will appear.
- Starred: contacts you have manually starred. If someone is a hot lead and you want to keep them front of mind, click Mark as Starred on their conversation. They will stay in this section whether they are read or unread. To remove them, click Unmark.
- All: everything in your inbox, with no filters applied.
Search and filtering
At the top of the inbox list, you can search by name to find a specific contact's conversation. You can also filter by communication channel. Because your inbox contains Facebook messages, Instagram DMs, SMS, and emails all mixed together, it can be overwhelming without filters. Click the filter icon, select the channels you want (for example, just SMS), and click Apply. The list will update to only show conversations from those channels. Clear all filters when you want to go back to the full view.
The conversation history (middle pane)
When you select a contact from the inbox list, the middle column shows the full history of every interaction with that person. This includes:
- Every email sent and received
- Every SMS sent and received
- Opportunities they have been added to
- Internal notes added by you or your team
- Automated messages sent by workflows
This is one of the most powerful parts of Grow. You get a complete timeline of everything that has happened with a contact, all in one scrollable view.
Email open tracking
For emails, Grow shows delivery and open status with colour indicators:
- Blue: the email has been delivered successfully.
- Green (with “opened”): the recipient has opened the email.
This gives you a clear picture of whether your emails are actually being read, which is especially useful during follow-up sequences.
Identifying which workflow sent a message
If you see an automated SMS or email in the conversation history and want to know which workflow it came from, click the three dots on that message, then click Details. You will see Automation Workflow listed, and you can click through to open that workflow directly. This is useful when you spot a message you want to edit or when you need to trace why a contact received a particular communication.
Sending messages
At the bottom of the conversation history pane, you will see tabs for SMS, WhatsApp, and Email. Before typing your message, make sure you have selected the correct channel.
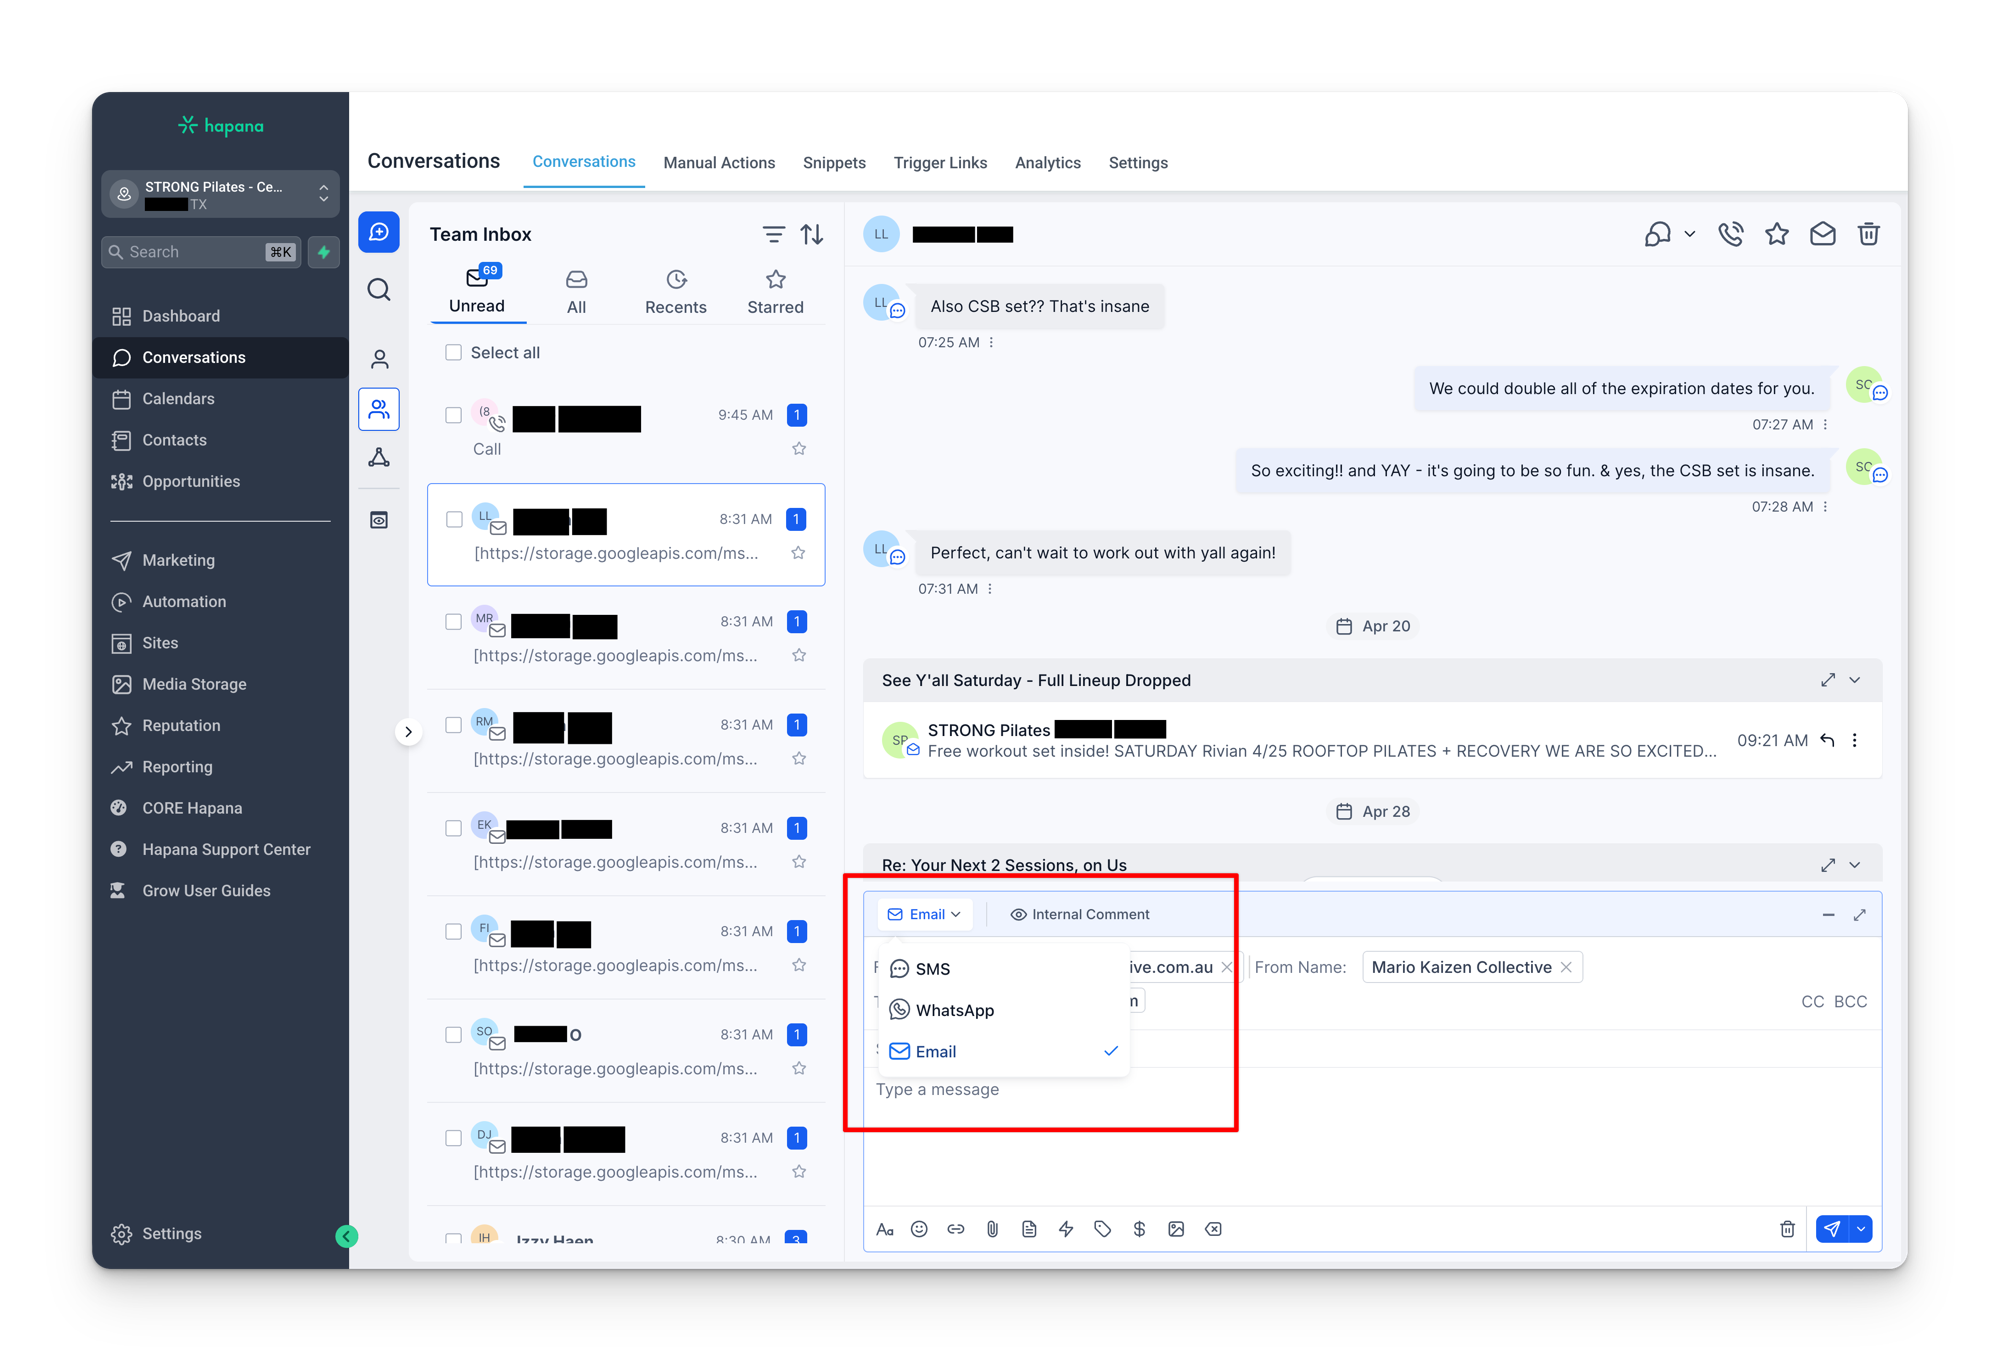
Check the channel before you send
A common mistake is typing a reply without checking which channel tab is selected. If a contact messaged you via SMS but the email tab is active, your reply will go out as an email instead. Always glance at which tab is highlighted before composing your message.
Enter sends immediately
The compose area works like a chat box, not like an email client. Pressing Enter (or Return) will send the message immediately. If you need to start a new paragraph without sending, press Shift + Enter (or Shift + Return on Mac). Get in the habit of using Shift + Enter while composing so you do not accidentally send a half-finished message.
Scheduled sending
You can schedule messages to send at a later time. This works for SMS, WhatsApp, and email. Use the schedule option next to the send button to pick your date and time.
Email from address
When you compose an email, the “from” address defaults to the email of the user you are logged in as. If you want the email to come from a different address (for example, the studio's general email instead of your personal one), you can change it. Click on the from address, remove it, and type in the email you want to send from. Alternatively, log in as that user and the from address will update automatically.
Contact details (right pane)
The right column shows key information about the contact you are viewing. This is not the full contact record (you can access that from the Contacts page), but it gives you enough context to manage the conversation without leaving the inbox.
What you will see in this panel:
- Name and phone number
- Assigned user: which team member is responsible for this contact.
- Tags: all tags currently applied to the contact.
- Active workflows: any automations the contact is currently enrolled in. This is useful for understanding what automated messages they are receiving.
- DND status: if the contact has opted out of a communication channel (for example, they replied STOP to a text message), it will show as DND for that channel. You can untick this if the opt-out was accidental.
- Appointments: any current or past bookings associated with the contact.
- Tasks: pending and completed tasks for this contact. You can add new tasks directly from here. For example, if you are on a call and need to follow up in two weeks, click Add Task, write your note, assign it to someone, set the due date, and save. You can also delete tasks or mark them complete from this panel.
- Notes: historical notes attached to the contact, both automated and manual. Add your own notes to keep a record of important context.
Snippets
Snippets are pre-written message templates you can insert when composing an SMS. Instead of typing the same message repeatedly, you can click Insert Snippet in the compose area, choose the snippet you want, and it will populate the message field for you. Send it as is or edit it before sending.
Snippets serve two purposes:
- Quick manual replies: when you are sending the same type of message frequently (booking confirmations, follow-up messages), snippets save time.
- Workflow templates: many of your automated workflows use snippets as their message content. This means if you edit a snippet, the change will also apply wherever that snippet is used in your workflows.
Editing a snippet
To update a snippet, go to the snippets section (accessible from the Conversations sub-menu), find the snippet you want to change, click the three dots, and select Edit SMS. Your changes will take effect immediately and will also update in any workflows that reference that snippet.
Manual actions and trigger links
Inside the Conversations sub-menu, you will also see Manual Actions and Trigger Links. Manual actions allow you to create manual message or phone call tasks, but this feature is rarely used in day to day operations. Trigger links are not used in the STRONG franchise setup, so you can safely ignore that section.